> ## Documentation Index
> Fetch the complete documentation index at: https://pipedream.com/docs/llms.txt
> Use this file to discover all available pages before exploring further.
# Running Workflows for Your End Users
export const PUBLIC_APPS = '3,000';
Just like you can build and run internal [workflows](/workflows/building-workflows/) for your team, **you can run workflows for [your end users](/connect/api-reference/introduction), too**.
Whether you’re building well-defined integrations or autonomous AI agents, workflows provide a powerful set of tools for running [code](/workflows/building-workflows/code/) or [pre-defined actions](/workflows/building-workflows/actions/) on behalf of your users. Pipedream’s UI makes it easy to build, test, and [debug](/workflows/building-workflows/inspect/) workflows.
## What are workflows?
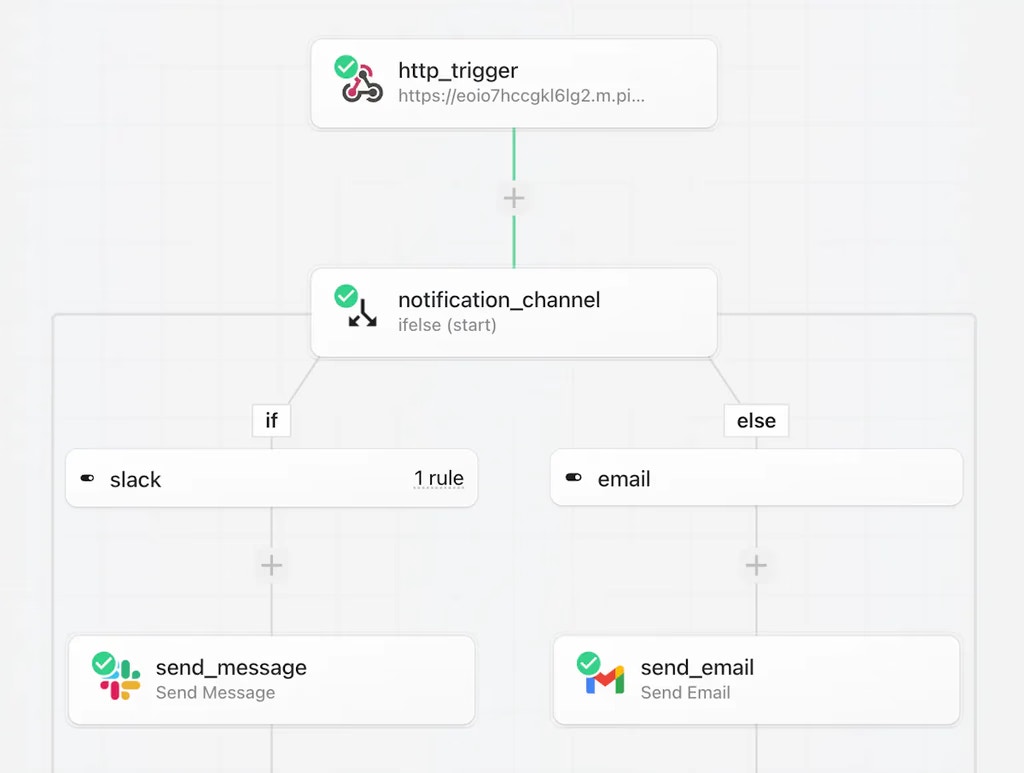 Workflows are sequences of [steps](/workflows/#steps) [triggered by an event](/workflows/building-workflows/triggers/), like an HTTP request, or new rows in a Google sheet.
You can use [pre-built actions](/workflows/building-workflows/actions/) or custom [Node.js](/workflows/building-workflows/code/nodejs/), [Python](/workflows/building-workflows/code/python/), [Golang](/workflows/building-workflows/code/go/), or [Bash](/workflows/building-workflows/code/bash/) code in workflows and connect to any of our {PUBLIC_APPS} integrated apps.
Workflows also have built-in:
* [Flow control](/workflows/building-workflows/control-flow/)
* [Concurrency and throttling](/workflows/building-workflows/settings/concurrency-and-throttling/)
* [Key-value stores](/workflows/data-management/data-stores/)
* [Error handling](/workflows/building-workflows/errors/)
* [VPCs](/workflows/vpc/)
* [And more](https://pipedream.com/pricing)
Read [the quickstart](/workflows/quickstart/) to learn more.
## Getting started
[Create a new workflow](/workflows/building-workflows/) or open an existing one.
To get started building workflows for your end users:
1. Add an [HTTP trigger](/workflows/building-workflows/triggers/#http) to your workflow
2. Generate a test event with the required headers:
* `x-pd-environment: development`
* `x-pd-external-user-id: {your_external_user_id}`
See the [Triggering your workflow](/connect/workflows/#triggering-your-workflow) section below for details on securing your workflow with OAuth and deploying triggers on behalf of your end users.
When you configure [pre-built actions](/workflows/building-workflows/actions/) or [custom code that connects to third-party APIs](/workflows/building-workflows/code/nodejs/auth/), you can link accounts in one of two ways:
1. **Use your own account**: If you’re connecting to an API that uses your own API key or developer account — for example, a workflow that connects to the OpenAI API or a PostgreSQL database — click the **Connect account** button to link your own, static account.
Workflows are sequences of [steps](/workflows/#steps) [triggered by an event](/workflows/building-workflows/triggers/), like an HTTP request, or new rows in a Google sheet.
You can use [pre-built actions](/workflows/building-workflows/actions/) or custom [Node.js](/workflows/building-workflows/code/nodejs/), [Python](/workflows/building-workflows/code/python/), [Golang](/workflows/building-workflows/code/go/), or [Bash](/workflows/building-workflows/code/bash/) code in workflows and connect to any of our {PUBLIC_APPS} integrated apps.
Workflows also have built-in:
* [Flow control](/workflows/building-workflows/control-flow/)
* [Concurrency and throttling](/workflows/building-workflows/settings/concurrency-and-throttling/)
* [Key-value stores](/workflows/data-management/data-stores/)
* [Error handling](/workflows/building-workflows/errors/)
* [VPCs](/workflows/vpc/)
* [And more](https://pipedream.com/pricing)
Read [the quickstart](/workflows/quickstart/) to learn more.
## Getting started
[Create a new workflow](/workflows/building-workflows/) or open an existing one.
To get started building workflows for your end users:
1. Add an [HTTP trigger](/workflows/building-workflows/triggers/#http) to your workflow
2. Generate a test event with the required headers:
* `x-pd-environment: development`
* `x-pd-external-user-id: {your_external_user_id}`
See the [Triggering your workflow](/connect/workflows/#triggering-your-workflow) section below for details on securing your workflow with OAuth and deploying triggers on behalf of your end users.
When you configure [pre-built actions](/workflows/building-workflows/actions/) or [custom code that connects to third-party APIs](/workflows/building-workflows/code/nodejs/auth/), you can link accounts in one of two ways:
1. **Use your own account**: If you’re connecting to an API that uses your own API key or developer account — for example, a workflow that connects to the OpenAI API or a PostgreSQL database — click the **Connect account** button to link your own, static account.
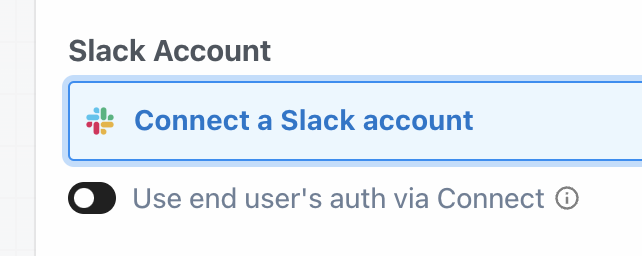 2. **Use your end users’ auth**: If you’re building a workflow that connects to your end users’ accounts — for example, a workflow that sends a message with your user’s Slack account — you can select the option to **Use end user’s auth via Connect**:
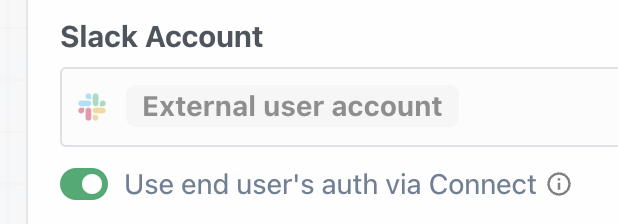 When you trigger the workflow, Pipedream will look up the corresponding account for the end user whose user ID you provide [when invoking the workflow](/connect/workflows/#invoke-the-workflow).
To run an end-to-end test as an end user, you need to have users and connected accounts in your project. If you already have a **development** account linked, you can skip this step.
If you don’t, the fastest way to do this is [on the **Users** tab](/connect/managed-auth/users/) in your Pipedream project:
* You’ll see there’s a button to **Connect account**
* Go through the flow and make sure to create the account in **development** mode
* Note the **external user ID** of the account you just connected, you’ll need it in the next step
Test events are critical for developing workflows effectively. Without a test event, you won’t be able to test your workflow end to end in the builder, see the shape of the event data that triggers the workflow, and the lookup to use your end user’s auth won’t work.
To generate a test event, click **Send Test Event** in the trigger, and fill in the event data. This will trigger the workflow and allow you to test the workflow end to end in the builder.
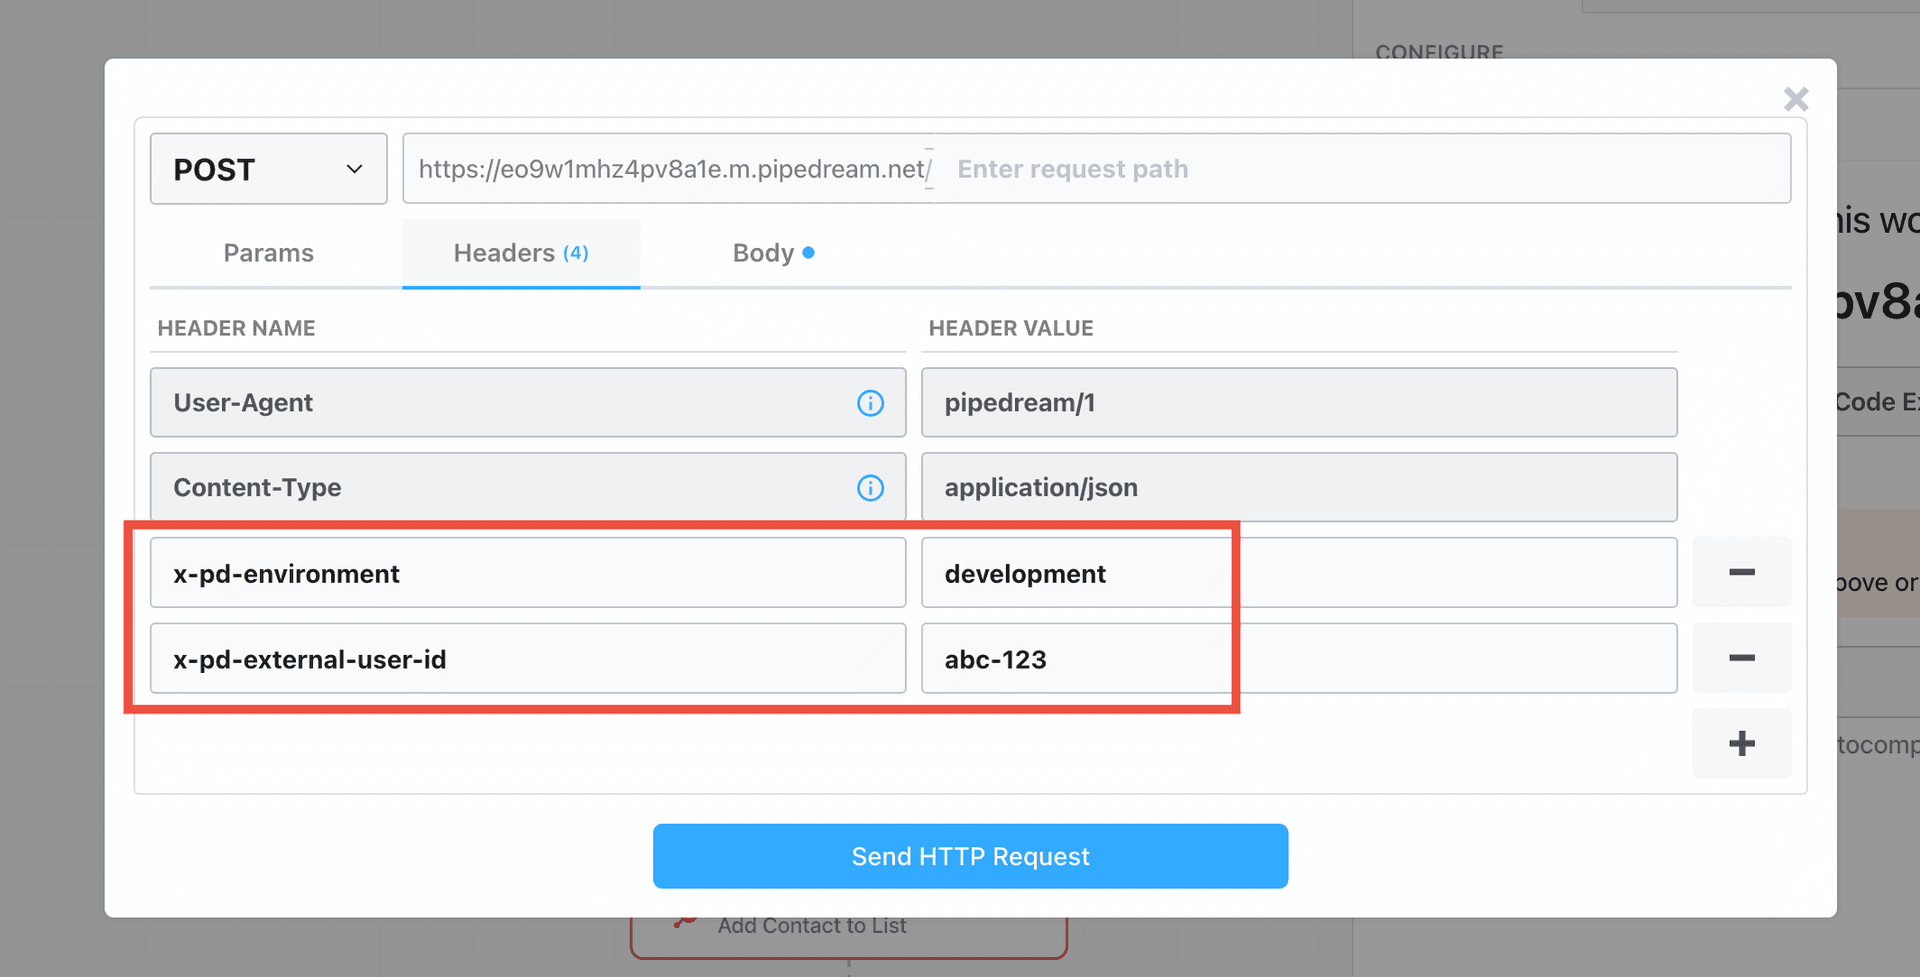
Make sure to include these headers in your test request:
* `x-pd-environment: development`
* `x-pd-external-user-id: {your_external_user_id}`
When you trigger the workflow, Pipedream will look up the corresponding account for the end user whose user ID you provide [when invoking the workflow](/connect/workflows/#invoke-the-workflow).
To run an end-to-end test as an end user, you need to have users and connected accounts in your project. If you already have a **development** account linked, you can skip this step.
If you don’t, the fastest way to do this is [on the **Users** tab](/connect/managed-auth/users/) in your Pipedream project:
* You’ll see there’s a button to **Connect account**
* Go through the flow and make sure to create the account in **development** mode
* Note the **external user ID** of the account you just connected, you’ll need it in the next step
Test events are critical for developing workflows effectively. Without a test event, you won’t be able to test your workflow end to end in the builder, see the shape of the event data that triggers the workflow, and the lookup to use your end user’s auth won’t work.
To generate a test event, click **Send Test Event** in the trigger, and fill in the event data. This will trigger the workflow and allow you to test the workflow end to end in the builder.
Make sure to include these headers in your test request:
* `x-pd-environment: development`
* `x-pd-external-user-id: {your_external_user_id}`
 When you’re done with the workflow, click **Deploy** at the top right.
If you’re using TypeScript or a JavaScript runtime, [install the Pipedream SDK](/connect/api-reference/introduction). Pipedream also provides an HTTP API for invoking workflows (see example below).
```sh theme={null}
npm i @pipedream/sdk
```
To invoke workflows, you’ll need:
1. The OAuth client ID and secret from your OAuth client in **step 2 above** (if configured)
2. Your [Project ID](/projects/#finding-your-projects-id)
3. Your workflow’s HTTP endpoint URL
4. The [external user ID](/connect/api-reference/introduction) of the user you’d like to run the workflow for
5. The [Connect environment](/connect/managed-auth/environments/) tied to the user’s account
Then invoke the workflow like so:
```typescript TypeScript theme={null}
import { PipedreamClient } from "@pipedream/sdk";
// These secrets should be saved securely and passed to your environment
const client = new PipedreamClient({
projectEnvironment: "development", // change to production if running for a test production account, or in production
clientId: "{oauth_client_id}",
clientSecret: "{oauth_client_secret}",
projectId: "{your_project_id}"
});
await client.workflows.invokeForExternalUser(
urlOrEndpoint: "{your_endpoint_url}", // pass the endpoint ID or full URL here
externalUserId: "{your_external_user_id}", // The end user's ID in your system
method: "POST", // "GET", "POST", "PUT", "DELETE", "PATCH"
body: {
message: "Hello World"
},
)
```
```sh HTTP (cURL) theme={null}
# First, obtain an OAuth access token
curl -X POST https://api.pipedream.com/v1/oauth/token \
-H "Content-Type: application/json" \
-d '{
"grant_type": "client_credentials",
"client_id": "{oauth_client_id}",
"client_secret": "{oauth_client_secret}"
}'
# The response will include an access_token. Use it in the Authorization header below.
curl -X POST https://{your-endpoint-url} \
-H "Content-Type: application/json" \
-H "Authorization: Bearer {access_token}" \
-H 'X-PD-External-User-ID: {your_external_user_id}' \
-H 'X-PD-Environment: development' \ # 'development' or 'production'
-d '{
"message": "Hello, world"
}'
```
## Configuring workflow steps
When configuring a workflow that’s using your end user’s auth instead of your own, you’ll need to define most configuration fields manually in each step.
For example, normally when you connect your own Google Sheets account directly in the builder, you can dynamically list all of the available sheets from a dropdown.
When you’re done with the workflow, click **Deploy** at the top right.
If you’re using TypeScript or a JavaScript runtime, [install the Pipedream SDK](/connect/api-reference/introduction). Pipedream also provides an HTTP API for invoking workflows (see example below).
```sh theme={null}
npm i @pipedream/sdk
```
To invoke workflows, you’ll need:
1. The OAuth client ID and secret from your OAuth client in **step 2 above** (if configured)
2. Your [Project ID](/projects/#finding-your-projects-id)
3. Your workflow’s HTTP endpoint URL
4. The [external user ID](/connect/api-reference/introduction) of the user you’d like to run the workflow for
5. The [Connect environment](/connect/managed-auth/environments/) tied to the user’s account
Then invoke the workflow like so:
```typescript TypeScript theme={null}
import { PipedreamClient } from "@pipedream/sdk";
// These secrets should be saved securely and passed to your environment
const client = new PipedreamClient({
projectEnvironment: "development", // change to production if running for a test production account, or in production
clientId: "{oauth_client_id}",
clientSecret: "{oauth_client_secret}",
projectId: "{your_project_id}"
});
await client.workflows.invokeForExternalUser(
urlOrEndpoint: "{your_endpoint_url}", // pass the endpoint ID or full URL here
externalUserId: "{your_external_user_id}", // The end user's ID in your system
method: "POST", // "GET", "POST", "PUT", "DELETE", "PATCH"
body: {
message: "Hello World"
},
)
```
```sh HTTP (cURL) theme={null}
# First, obtain an OAuth access token
curl -X POST https://api.pipedream.com/v1/oauth/token \
-H "Content-Type: application/json" \
-d '{
"grant_type": "client_credentials",
"client_id": "{oauth_client_id}",
"client_secret": "{oauth_client_secret}"
}'
# The response will include an access_token. Use it in the Authorization header below.
curl -X POST https://{your-endpoint-url} \
-H "Content-Type: application/json" \
-H "Authorization: Bearer {access_token}" \
-H 'X-PD-External-User-ID: {your_external_user_id}' \
-H 'X-PD-Environment: development' \ # 'development' or 'production'
-d '{
"message": "Hello, world"
}'
```
## Configuring workflow steps
When configuring a workflow that’s using your end user’s auth instead of your own, you’ll need to define most configuration fields manually in each step.
For example, normally when you connect your own Google Sheets account directly in the builder, you can dynamically list all of the available sheets from a dropdown.
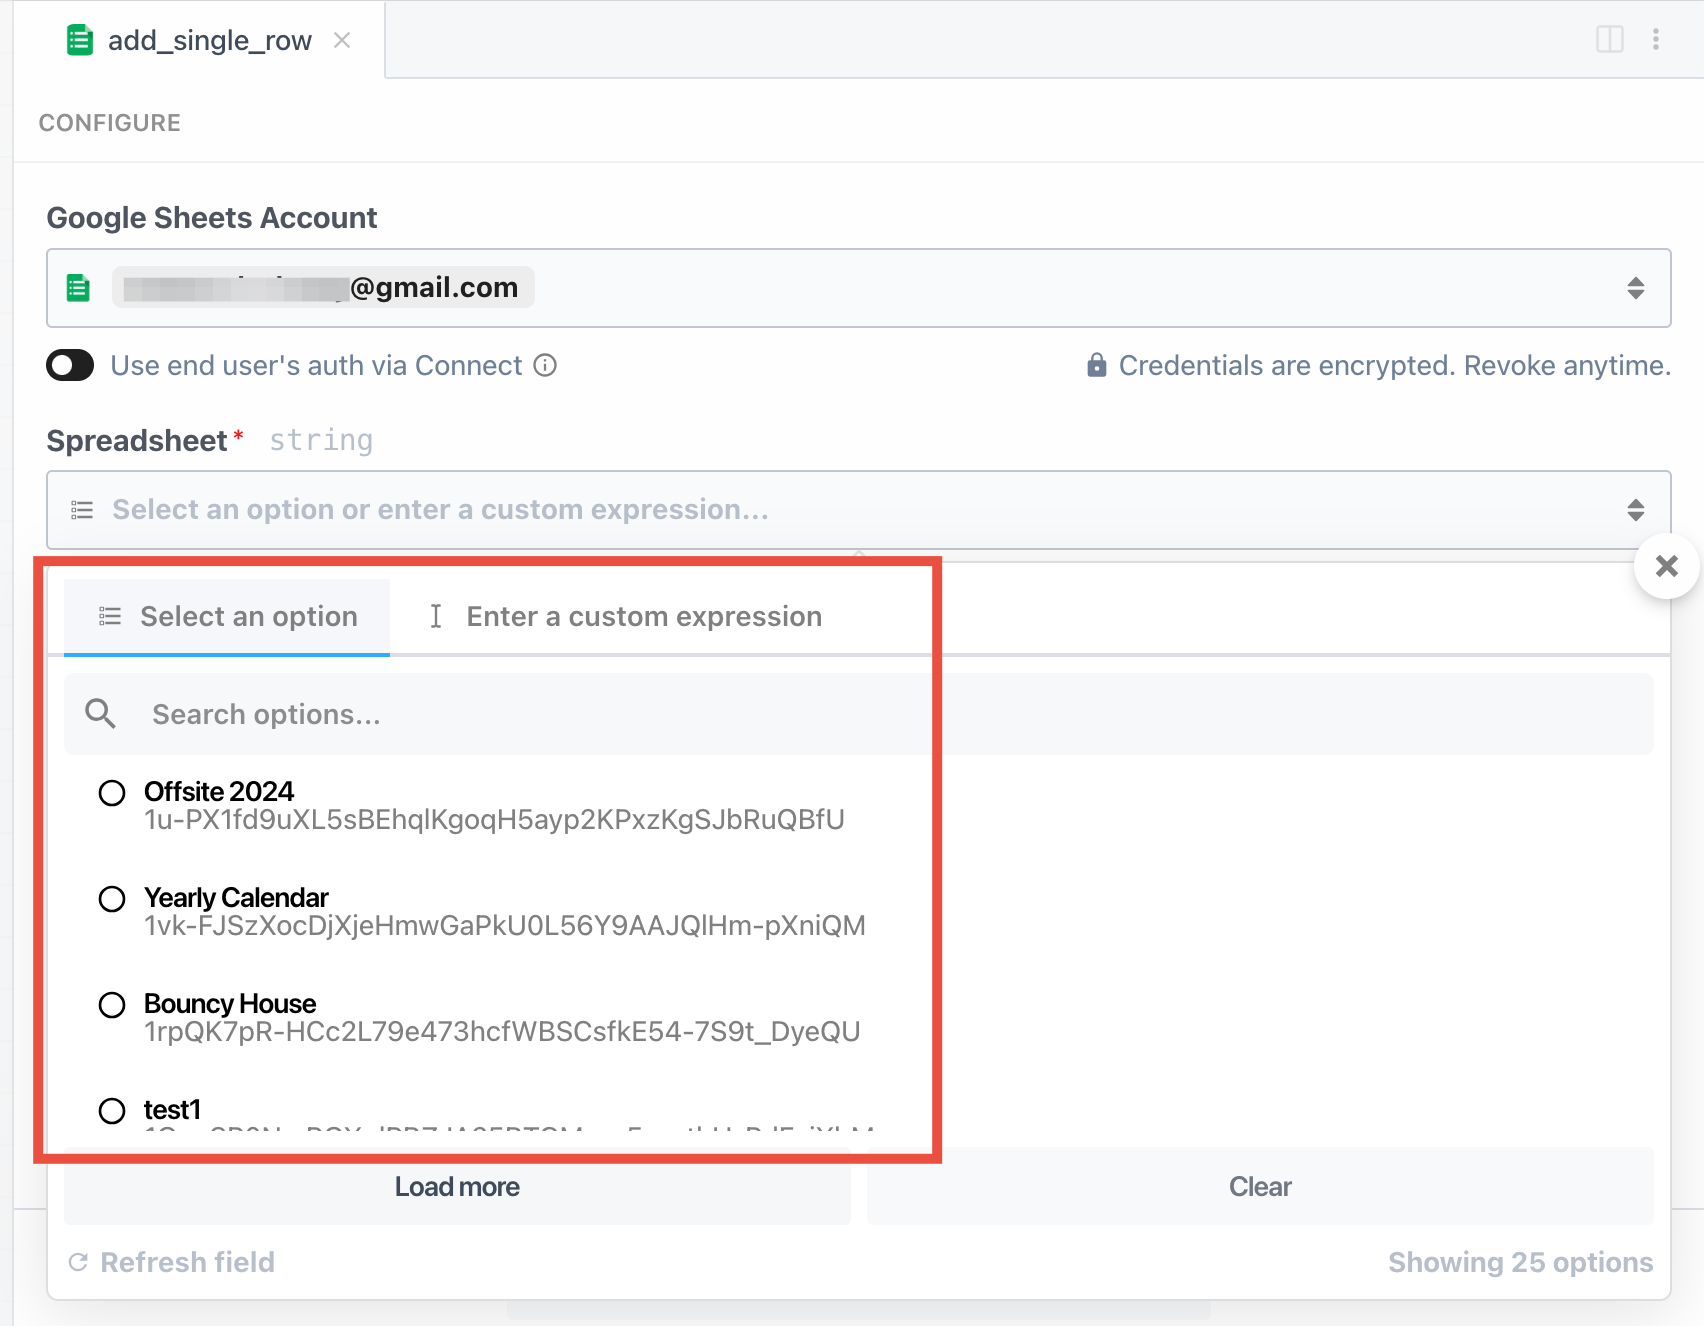 However, when running workflows on behalf of your end users, that UI configuration doesn’t work, since the Google Sheets account to use is determined at the time of workflow execution. So instead, you’ll need to configure these fields manually.
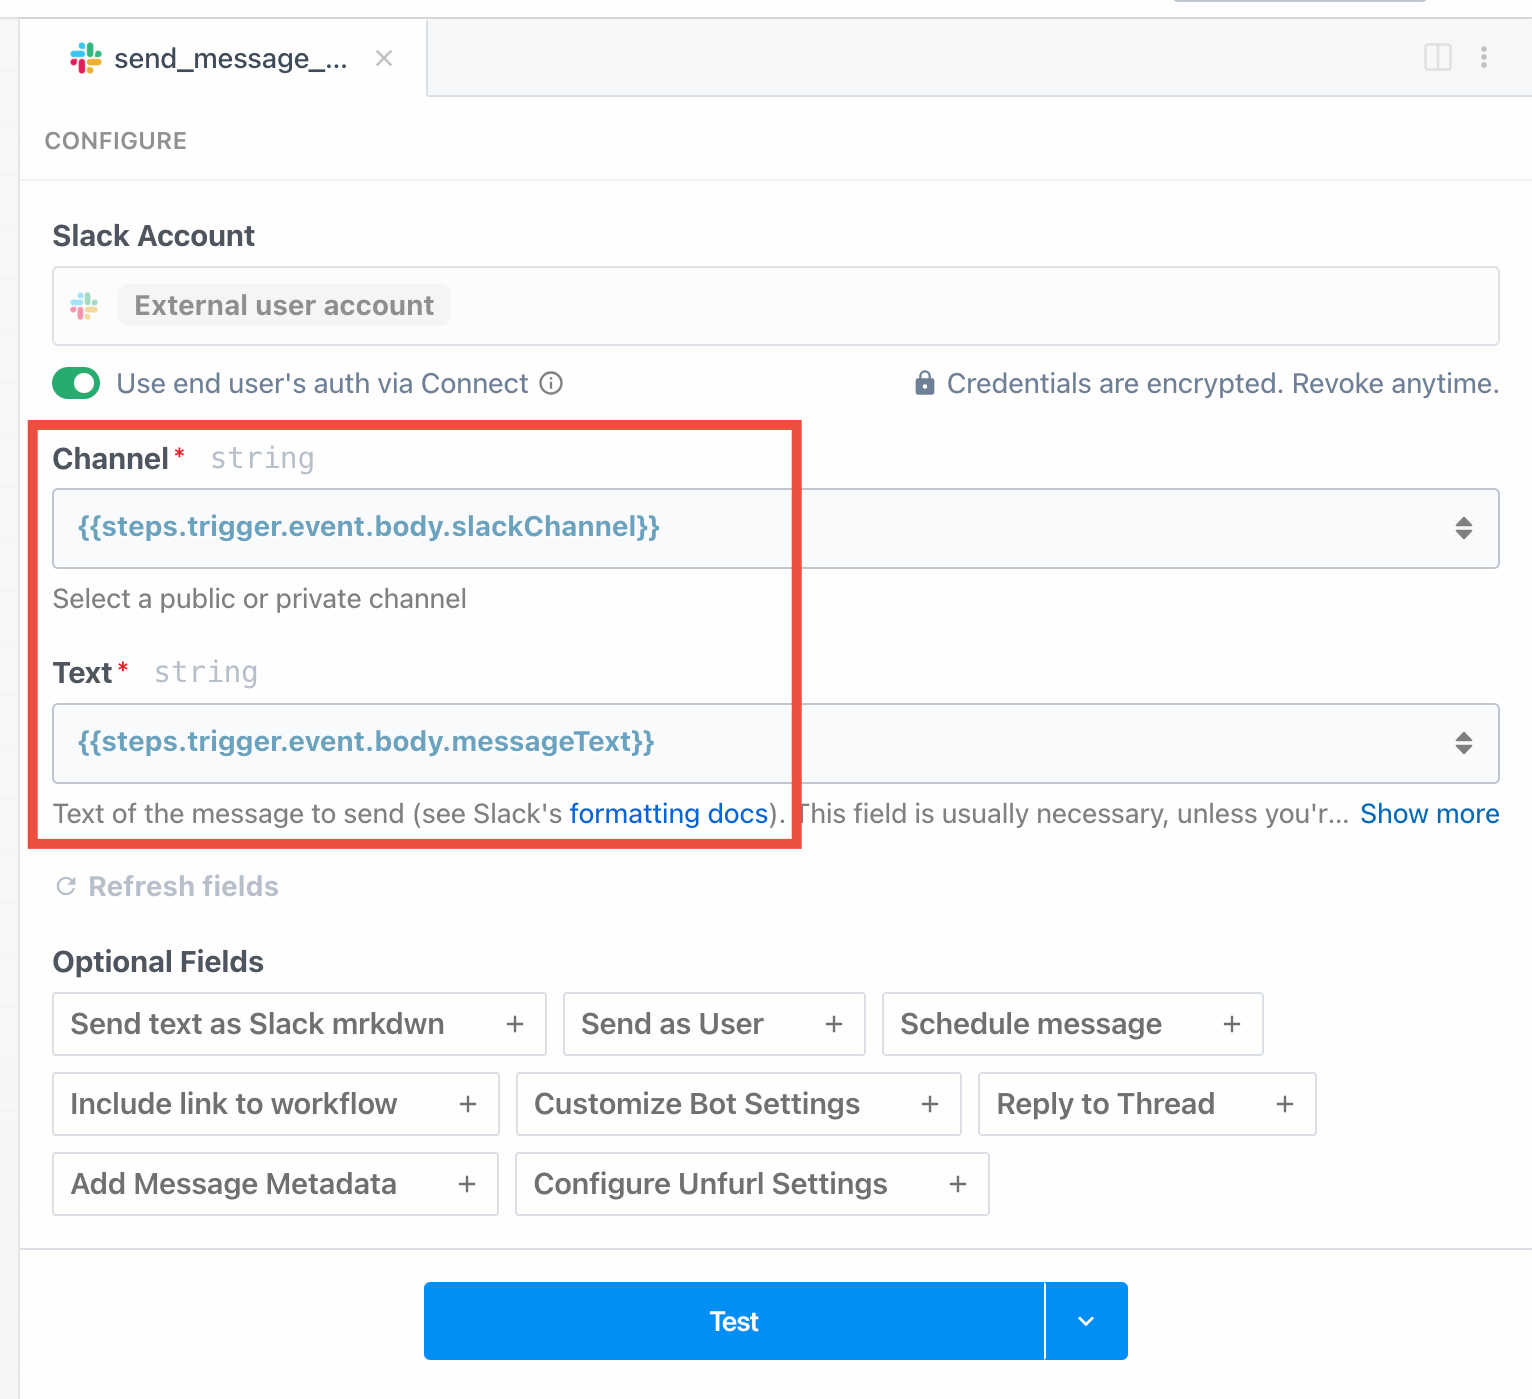
* Either make sure to pass all required configuration data when invoking the workflow, or add a step to your workflow that retrieve it from your database, etc. For example:
```sh theme={null}
curl -X POST https://{your-endpoint-url} \
-H "Content-Type: application/json" \
-H "Authorization: Bearer {access_token}" \
-H 'X-PD-External-User-ID: {your_external_user_id}' \
-H 'X-PD-Environment: development' \ # 'development' or 'production'
-d '{
"slackChannel": "#general",
"messageText": "Hello, world!",
"gitRepo": "AcmeOrg/acme-repo",
"issueTitle": "Test Issue"
}' \
```
* Then in the Slack and GitHub steps, you’d reference those fields directly:
However, when running workflows on behalf of your end users, that UI configuration doesn’t work, since the Google Sheets account to use is determined at the time of workflow execution. So instead, you’ll need to configure these fields manually.
* Either make sure to pass all required configuration data when invoking the workflow, or add a step to your workflow that retrieve it from your database, etc. For example:
```sh theme={null}
curl -X POST https://{your-endpoint-url} \
-H "Content-Type: application/json" \
-H "Authorization: Bearer {access_token}" \
-H 'X-PD-External-User-ID: {your_external_user_id}' \
-H 'X-PD-Environment: development' \ # 'development' or 'production'
-d '{
"slackChannel": "#general",
"messageText": "Hello, world!",
"gitRepo": "AcmeOrg/acme-repo",
"issueTitle": "Test Issue"
}' \
```
* Then in the Slack and GitHub steps, you’d reference those fields directly:
 We plan to improve this interface in the future, and potentially allow developers to store end user metadata and configuration data alongside the connected account for your end users, so you won’t need to pass the data at runtime. [Let us know](https://pipedream.com/support) if that’s a feature you’d like to see.
## Testing
To test a step using the connected account of one of your end users in the builder, you’ll need a few things to be configured so that your workflow knows which account to use.
**Make sure you have an external user with the relevant connected account(s) saved to your project:**
* Go to the **[Users tab](/connect/managed-auth/users/)** in the **Connect** section of your project to confirm
* If not, either connect one from your application or [directly in the UI](/connect/workflows/#connect-a-test-account)
**Pass the environment and external user ID:**
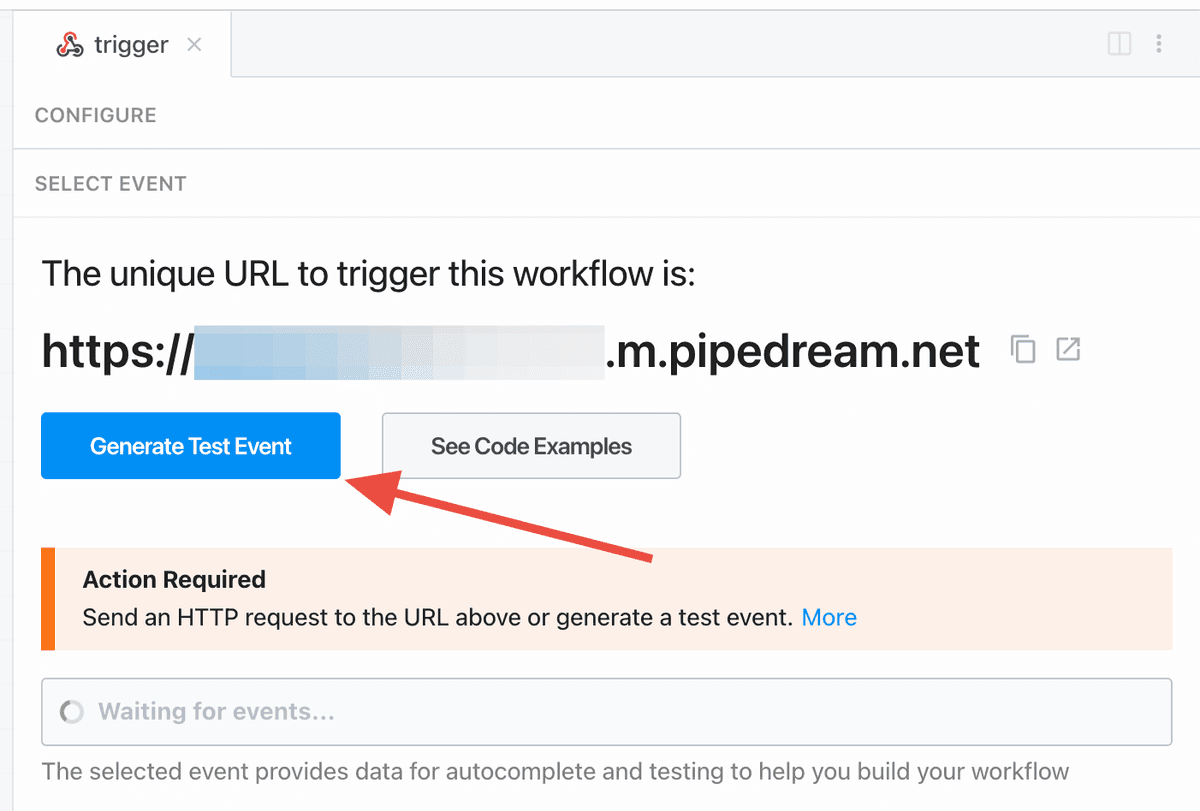
1. Once you’ve added an HTTP trigger to the workflow, click **Generate test event**
We plan to improve this interface in the future, and potentially allow developers to store end user metadata and configuration data alongside the connected account for your end users, so you won’t need to pass the data at runtime. [Let us know](https://pipedream.com/support) if that’s a feature you’d like to see.
## Testing
To test a step using the connected account of one of your end users in the builder, you’ll need a few things to be configured so that your workflow knows which account to use.
**Make sure you have an external user with the relevant connected account(s) saved to your project:**
* Go to the **[Users tab](/connect/managed-auth/users/)** in the **Connect** section of your project to confirm
* If not, either connect one from your application or [directly in the UI](/connect/workflows/#connect-a-test-account)
**Pass the environment and external user ID:**
1. Once you’ve added an HTTP trigger to the workflow, click **Generate test event**
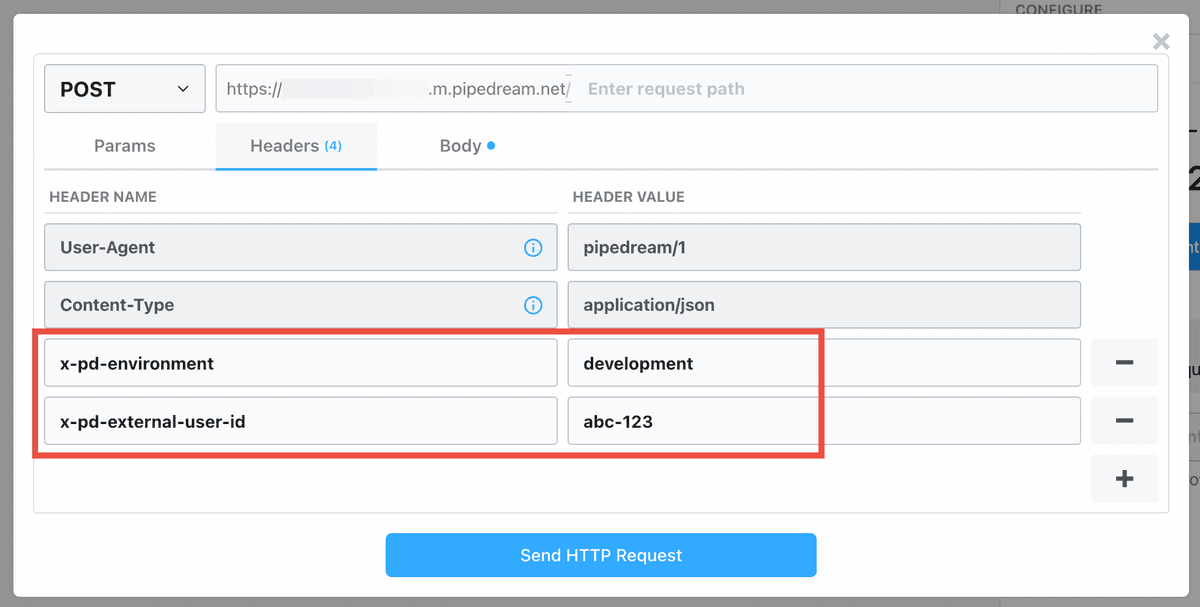
 2. Click on the **Headers** tab
3. Make sure `x-pd-environment` is set (you’ll likely want to `development`)
4. Make sure to also pass `x-pd-external-user-id` with the external user ID of the user you’d like to test with
2. Click on the **Headers** tab
3. Make sure `x-pd-environment` is set (you’ll likely want to `development`)
4. Make sure to also pass `x-pd-external-user-id` with the external user ID of the user you’d like to test with
 ## Triggering your workflow
You have two options for triggering workflows that run on behalf of your end users:
1. [Invoke via HTTP webhook](/connect/workflows/#http-webhook)
2. [Deploy an event source](/connect/workflows/#deploy-an-event-source) (Slack, Gmail, etc.)
### HTTP Webhook
The most common way to trigger workflows is via HTTP webhook. We strongly recommend [creating a Pipedream OAuth client](/connect/api-reference/authentication#creating-an-oauth-client) and authenticating inbound requests to your workflows.
This section refers to authenticating requests to the Pipedream API. For info on how managed auth works for your end users, refer to the [managed auth quickstart](/connect/managed-auth/quickstart/).
To get started, you’ll need:
* [OAuth client ID and secret](/connect/api-reference/authentication#creating-an-oauth-client) for authenticating with the Pipedream API
* Your [project ID](/projects/#finding-your-projects-id)
* Your workflow’s HTTP endpoint URL
* The [external user ID](/connect/api-reference/introduction) of your end user
* The [Connect environment](/connect/managed-auth/environments/)
```typescript TypeScript theme={null}
import { PipedreamClient } from "@pipedream/sdk";
// These secrets should be saved securely and passed to your environment
const client = new PipedreamClient({
projectEnvironment: "development", // change to production if running for a test production account, or in production
clientId: "{oauth_client_id}",
clientSecret: "{oauth_client_secret}",
projectId: "{your_project_id}"
});
await client.workflows.invokeForExternalUser(
urlOrEndpoint: "{your_endpoint_url}", // pass the endpoint ID or full URL here
externalUserId: "{your_external_user_id}", // The end user's ID in your system
method: "POST", // "GET", "POST", "PUT", "DELETE", "PATCH"
body: {
message: "Hello World"
},
)
```
```sh HTTP (cURL) theme={null}
# First, obtain an OAuth access token
curl -X POST https://api.pipedream.com/v1/oauth/token \
-H "Content-Type: application/json" \
-d '{
"grant_type": "client_credentials",
"client_id": "{oauth_client_id}",
"client_secret": "{oauth_client_secret}"
}'
# The response will include an access_token. Use it in the Authorization header below.
curl -X POST https://{your-endpoint-url} \
-H "Content-Type: application/json" \
-H "Authorization: Bearer {access_token}" \
-H 'X-PD-External-User-ID: {your_external_user_id}' \
-H 'X-PD-Environment: development' \ # 'development' or 'production'
-d '{
"message": "Hello, world"
}'
```
### Deploy an event source
You can [programmatically deploy triggers via the API](/connect/api-reference/deploy-trigger) to have events from integrated apps (like [new Slack messages](https://pipedream.com/apps/slack/triggers/new-message-in-channels) or [new emails in Gmail](https://pipedream.com/apps/gmail/triggers/new-email-received)) trigger your workflow. This allows you to:
* Deploy triggers for specific users from your application
* Configure trigger parameters per-user
* Manage deployed triggers via the API
See the [API documentation](/connect/api-reference/deploy-trigger) for detailed examples of deploying and managing triggers.
## OAuth client requirements
When using OAuth apps (like Google Drive, Slack, Notion, etc.) with your end users, you **must use your own custom OAuth clients**.
1. Register your own OAuth application with each third-party service (Google Drive, Slack, etc.)
2. [Add your OAuth client credentials to Pipedream](/apps/oauth-clients/#configuring-custom-oauth-clients)
3. Make sure to include your `oauthAppId` when connecting accounts for your end users
For detailed instructions, see the [OAuth Clients documentation](/connect/managed-auth/oauth-clients/#using-a-custom-oauth-client).
## Troubleshooting
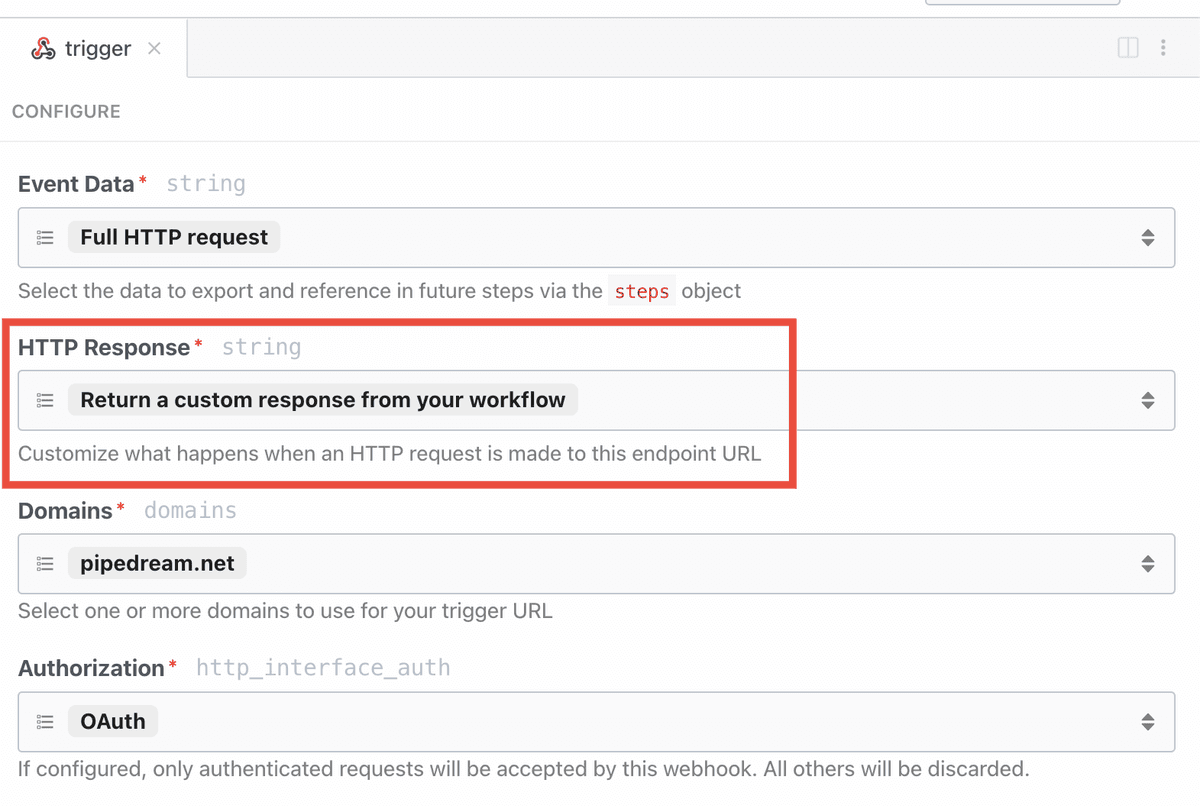
For help debugging issues with your workflow, you can return verbose error messages to the caller by configuring the HTTP trigger to **Return a custom response from your workflow**.
## Triggering your workflow
You have two options for triggering workflows that run on behalf of your end users:
1. [Invoke via HTTP webhook](/connect/workflows/#http-webhook)
2. [Deploy an event source](/connect/workflows/#deploy-an-event-source) (Slack, Gmail, etc.)
### HTTP Webhook
The most common way to trigger workflows is via HTTP webhook. We strongly recommend [creating a Pipedream OAuth client](/connect/api-reference/authentication#creating-an-oauth-client) and authenticating inbound requests to your workflows.
This section refers to authenticating requests to the Pipedream API. For info on how managed auth works for your end users, refer to the [managed auth quickstart](/connect/managed-auth/quickstart/).
To get started, you’ll need:
* [OAuth client ID and secret](/connect/api-reference/authentication#creating-an-oauth-client) for authenticating with the Pipedream API
* Your [project ID](/projects/#finding-your-projects-id)
* Your workflow’s HTTP endpoint URL
* The [external user ID](/connect/api-reference/introduction) of your end user
* The [Connect environment](/connect/managed-auth/environments/)
```typescript TypeScript theme={null}
import { PipedreamClient } from "@pipedream/sdk";
// These secrets should be saved securely and passed to your environment
const client = new PipedreamClient({
projectEnvironment: "development", // change to production if running for a test production account, or in production
clientId: "{oauth_client_id}",
clientSecret: "{oauth_client_secret}",
projectId: "{your_project_id}"
});
await client.workflows.invokeForExternalUser(
urlOrEndpoint: "{your_endpoint_url}", // pass the endpoint ID or full URL here
externalUserId: "{your_external_user_id}", // The end user's ID in your system
method: "POST", // "GET", "POST", "PUT", "DELETE", "PATCH"
body: {
message: "Hello World"
},
)
```
```sh HTTP (cURL) theme={null}
# First, obtain an OAuth access token
curl -X POST https://api.pipedream.com/v1/oauth/token \
-H "Content-Type: application/json" \
-d '{
"grant_type": "client_credentials",
"client_id": "{oauth_client_id}",
"client_secret": "{oauth_client_secret}"
}'
# The response will include an access_token. Use it in the Authorization header below.
curl -X POST https://{your-endpoint-url} \
-H "Content-Type: application/json" \
-H "Authorization: Bearer {access_token}" \
-H 'X-PD-External-User-ID: {your_external_user_id}' \
-H 'X-PD-Environment: development' \ # 'development' or 'production'
-d '{
"message": "Hello, world"
}'
```
### Deploy an event source
You can [programmatically deploy triggers via the API](/connect/api-reference/deploy-trigger) to have events from integrated apps (like [new Slack messages](https://pipedream.com/apps/slack/triggers/new-message-in-channels) or [new emails in Gmail](https://pipedream.com/apps/gmail/triggers/new-email-received)) trigger your workflow. This allows you to:
* Deploy triggers for specific users from your application
* Configure trigger parameters per-user
* Manage deployed triggers via the API
See the [API documentation](/connect/api-reference/deploy-trigger) for detailed examples of deploying and managing triggers.
## OAuth client requirements
When using OAuth apps (like Google Drive, Slack, Notion, etc.) with your end users, you **must use your own custom OAuth clients**.
1. Register your own OAuth application with each third-party service (Google Drive, Slack, etc.)
2. [Add your OAuth client credentials to Pipedream](/apps/oauth-clients/#configuring-custom-oauth-clients)
3. Make sure to include your `oauthAppId` when connecting accounts for your end users
For detailed instructions, see the [OAuth Clients documentation](/connect/managed-auth/oauth-clients/#using-a-custom-oauth-client).
## Troubleshooting
For help debugging issues with your workflow, you can return verbose error messages to the caller by configuring the HTTP trigger to **Return a custom response from your workflow**.
 With that setting enabled on the trigger, below is an example of [this](/connect/workflows/#required-account-not-found-for-external-user-id) error:
```sh theme={null}
curl -X POST https://{your-endpoint-url} \
-H 'Content-Type: application/json' \
-H 'Authorization: Bearer {access_token}' \
-H "x-pd-environment: development" \
-H "x-pd-external-user-id: abc-123" \
-d '{
"slackChannel": "#general",
"messageText": "Hello, world! (sent via curl)",
"hubSpotList": "prospects",
"contactEmail": "foo@example.com"
}' \
Pipedream Connect Error: Required account for hubspot not found for external user ID abc-123 in development
```
### Common errors
#### No external user ID passed, but one or more steps require it
* One or more steps in the workflow are configured to **Use end user’s auth via Connect**, but no external user ID was passed when invoking the workflow.
* [Refer to the docs](/connect/workflows/#invoke-the-workflow) to make sure you’re passing external user ID correctly when invoking the workflow.
#### No matching external user ID
* There was an external user ID passed, but it didn’t match any users in the project.
* Double-check that the external user ID that you passed when invoking the workflow matches one either [in the UI](/connect/managed-auth/users/) or [via the API](/connect/api-reference/list-accounts).
#### Required account not found for external user ID
* The external user ID was passed when invoking the workflow, but the user doesn’t have a connected account for one or more of the apps that are configured to use it in this workflow execution.
* You can check which connected accounts are available for that user [in the UI](/connect/managed-auth/users/) or [via the API](/connect/api-reference/list-accounts).
#### Running workflows for your users in production requires a higher tier plan
* Anyone is able to run workflows for your end users in `development`.
* Visit the [pricing page](https://pipedream.com/pricing?plan=Connect) for the latest info on using Connect in production.
## Known limitations
#### Workflows can only use a single external user’s auth per execution
* Right now you cannot invoke a workflow to loop through many external user IDs within a single execution.
* You can only run a workflow for a single external user ID at a time (for now).
#### The external user ID to use during execution must be passed in the triggering event
* You can’t run a workflow on a timer for example, and look up the external user ID to use at runtime.
* The external user ID must be passed in the triggering event, typically via [HTTP trigger](/connect/workflows/#invoke-the-workflow).
#### Cannot use multiple accounts for the same app during a single execution
* If a user has multiple accounts for the same app (tied to a single external user), **Pipedream will use the most recently created account**.
* Learn about [managing connected accounts](/connect/managed-auth/users/) for your end users.
With that setting enabled on the trigger, below is an example of [this](/connect/workflows/#required-account-not-found-for-external-user-id) error:
```sh theme={null}
curl -X POST https://{your-endpoint-url} \
-H 'Content-Type: application/json' \
-H 'Authorization: Bearer {access_token}' \
-H "x-pd-environment: development" \
-H "x-pd-external-user-id: abc-123" \
-d '{
"slackChannel": "#general",
"messageText": "Hello, world! (sent via curl)",
"hubSpotList": "prospects",
"contactEmail": "foo@example.com"
}' \
Pipedream Connect Error: Required account for hubspot not found for external user ID abc-123 in development
```
### Common errors
#### No external user ID passed, but one or more steps require it
* One or more steps in the workflow are configured to **Use end user’s auth via Connect**, but no external user ID was passed when invoking the workflow.
* [Refer to the docs](/connect/workflows/#invoke-the-workflow) to make sure you’re passing external user ID correctly when invoking the workflow.
#### No matching external user ID
* There was an external user ID passed, but it didn’t match any users in the project.
* Double-check that the external user ID that you passed when invoking the workflow matches one either [in the UI](/connect/managed-auth/users/) or [via the API](/connect/api-reference/list-accounts).
#### Required account not found for external user ID
* The external user ID was passed when invoking the workflow, but the user doesn’t have a connected account for one or more of the apps that are configured to use it in this workflow execution.
* You can check which connected accounts are available for that user [in the UI](/connect/managed-auth/users/) or [via the API](/connect/api-reference/list-accounts).
#### Running workflows for your users in production requires a higher tier plan
* Anyone is able to run workflows for your end users in `development`.
* Visit the [pricing page](https://pipedream.com/pricing?plan=Connect) for the latest info on using Connect in production.
## Known limitations
#### Workflows can only use a single external user’s auth per execution
* Right now you cannot invoke a workflow to loop through many external user IDs within a single execution.
* You can only run a workflow for a single external user ID at a time (for now).
#### The external user ID to use during execution must be passed in the triggering event
* You can’t run a workflow on a timer for example, and look up the external user ID to use at runtime.
* The external user ID must be passed in the triggering event, typically via [HTTP trigger](/connect/workflows/#invoke-the-workflow).
#### Cannot use multiple accounts for the same app during a single execution
* If a user has multiple accounts for the same app (tied to a single external user), **Pipedream will use the most recently created account**.
* Learn about [managing connected accounts](/connect/managed-auth/users/) for your end users.