> ## Documentation Index
> Fetch the complete documentation index at: https://pipedream.com/docs/llms.txt
> Use this file to discover all available pages before exploring further.
# Make HTTP Requests with Node.js
HTTP requests are fundamental to working with APIs or other web services. You can make HTTP requests to retrieve data from APIs, fetch HTML from websites, or do pretty much anything your web browser can do.
**Below, we’ll review how to make HTTP requests using Node.js code on Pipedream.**
We’ll use the [`axios`](https://github.com/axios/axios) and [`got`](https://github.com/sindresorhus/got) HTTP clients in the examples below, but [you can use any npm package you’d like](/workflows/building-workflows/code/nodejs/#using-npm-packages) on Pipedream, so feel free to experiment with other clients, too.
If you’re developing Pipedream components, you may find the [`@pipedream/platform` version of `axios`](/workflows/building-workflows/http/#platform-axios) helpful for displaying error data clearly in the Pipedream UI.
If you’re new to HTTP, see our [glossary of HTTP terms](https://requestbin.com/blog/working-with-webhooks/#webhooks-glossary-common-terms) for a helpful introduction.
## Basic `axios` usage notes
To use `axios` on Pipedream, you’ll just need to import the `axios` npm package:
```javascript theme={null}
import axios from "axios";
```
You make HTTP requests by passing a [JavaScript object](https://developer.mozilla.org/en-US/Web/JavaScript/Guide/Working_with_Objects) to `axios` that defines the parameters of the request. For example, you’ll typically want to define the HTTP method and the URL you’re sending data to:
```javascript theme={null}
{
method: "GET",
url: `https://swapi.dev/api/films/`
}
```
`axios` returns a [Promise](https://developer.mozilla.org/en-US/Web/JavaScript/Guide/Using_promises), which is just a fancy way of saying that it makes the HTTP request in the background (asynchronously) while the rest of your code runs. On Pipedream, [all asynchronous code must be run synchronously](/workflows/building-workflows/code/nodejs/async/), which means you’ll need to wait for the HTTP request to finish before moving on to the next step. You do this by adding an `await` in front of the call to `axios`.
**Putting all of this together, here’s how to make a basic HTTP request on Pipedream:**
```javascript theme={null}
const resp = await axios({
method: "GET",
url: `https://swapi.dev/api/films/`,
});
```
The response object `resp` contains a lot of information about the response: its data, headers, and more. Typically, you just care about the data, which you can access in the `data` property of the response:
```javascript theme={null}
const resp = await axios({
method: "GET",
url: `https://swapi.dev/api/films/`,
});
// HTTP response data is in the data property
const data = resp.data;
```
Alternatively, you can access the data using [object destructuring](https://developer.mozilla.org/en-US/Web/JavaScript/Reference/Operators/Destructuring_assignment#Object_destructuring), which is equivalent to the above and preferred in modern JavaScript:
```javascript theme={null}
const { data } = resp;
```
## Send a `GET` request to fetch data
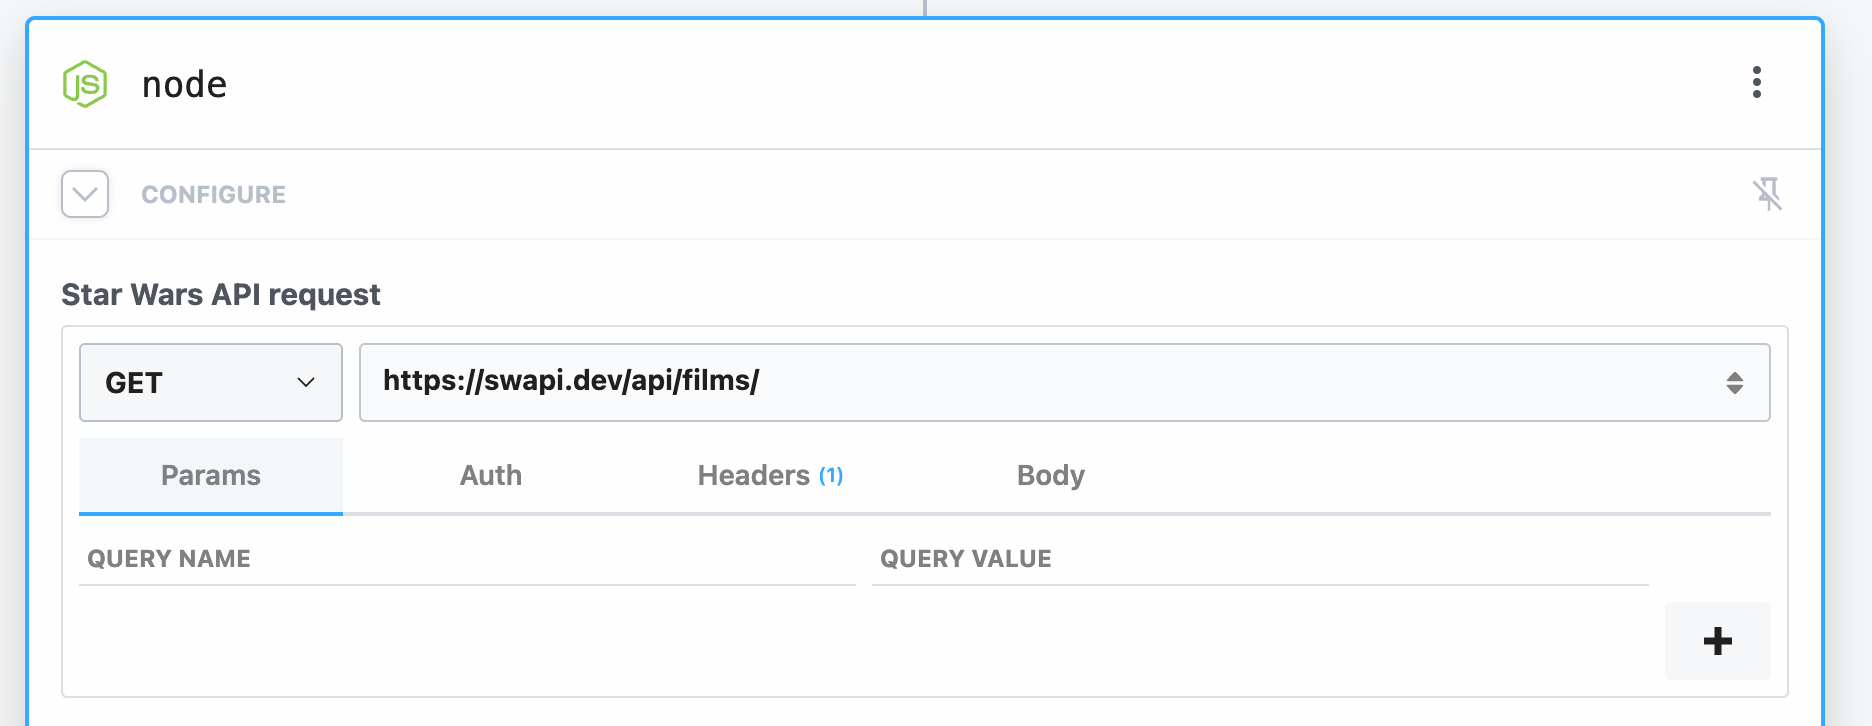
Make a request to retrieve Star Wars films from the Star Wars API:
```javascript axios theme={null}
import axios from "axios";
export default defineComponent({
async run({ steps, $ }) {
// Make an HTTP GET request using axios
const res = await axios({
method: "GET",
url: `https://swapi.dev/api/films/`,
});
// Retrieve just the data from the response
const { data } = res;
}
});
```
```javascript http-request prop theme={null}
export default defineComponent({
props: {
httpRequest: {
type: "http_request",
label: "Star Wars API request",
default: {
method: "GET",
url: "https://swapi.dev/api/films/"
}
},
},
async run({ steps, $ }) {
// Make an HTTP GET request using the http-request
const res = await this.httpRequest.execute();
// Retrieve just the data from the response
const { data } = res;
},
})
```
**Produces**
 ## Send a `POST` request to submit data
POST sample JSON to [JSONPlaceholder](https://jsonplaceholder.typicode.com/), a free mock API service:
```javascript axios theme={null}
import axios from "axios";
export default defineComponent({
async run({ steps, $ }) {
// Make an HTTP POST request using axios
const resp = await axios({
method: "POST",
url: `https://jsonplaceholder.typicode.com/posts`,
data: {
name: "Luke",
},
});
// Retrieve just the data from the response
const { data } = resp;
}
});
```
```javascript http-request prop theme={null}
export default defineComponent({
props: {
httpRequest: {
type: "http_request",
label: "JSON Placeholder API request",
default: {
method: "POST",
url: "https://jsonplaceholder.typicode.com/posts",
body: {
contentType: "application/json",
fields: [{ name: "Luke" }]
}
}
},
},
async run({ steps, $ }) {
// Make an HTTP GET request using the http-request
const res = await this.httpRequest.execute();
// Retrieve just the data from the response
const { data } = res;
},
})
```
When you make a `POST` request, you pass `POST` as the `method`, and include the data you’d like to send in the `data` object.
## Pass query string parameters to a `GET` request
Retrieve fake comment data on a specific post using [JSONPlaceholder](https://jsonplaceholder.typicode.com/), a free mock API service. Here, you fetch data from the `/comments` resource, retrieving data for a specific post by query string parameter: `/comments?postId=1`.
```javascript theme={null}
import axios from "axios";
export default defineComponent({
async run({ steps, $ }) {
// Make an HTTP GET request using axios
const resp = await axios({
method: "GET",
url: `https://jsonplaceholder.typicode.com/comments`,
params: {
postId: 1,
},
});
// Retrieve just the data from the response
const { data } = resp;
}
});
```
```javascript theme={null}
export default defineComponent({
props: {
httpRequest: {
type: "http_request",
label: "JSON Placeholder API request",
default: {
method: "GET",
url: "https://jsonplaceholder.typicode.com/comments",
params: {
fields: [{ postId: 1 }]
}
}
},
},
async run({ steps, $ }) {
// Make an HTTP GET request using the http-request
const res = await this.httpRequest.execute();
// Retrieve just the data from the response
const { data } = res;
},
})
```
You should pass query string parameters using the `params` object, like above. When you do, `axios` automatically [URL-encodes](https://www.w3schools.com/tags/ref_urlencode.ASP) the parameters for you, which you’d otherwise have to do manually.
## Send a request with HTTP headers
You pass HTTP headers in the `headers` object of the `axios` request:
```javascript theme={null}
import axios from "axios";
// Make an HTTP POST request using axios
const resp = await axios({
method: "POST",
url: `https://jsonplaceholder.typicode.com/posts`,
headers: {
"Content-Type": "application/json",
},
data: {
name: "Luke",
},
});
```
## Send a request with a secret or API key
Most APIs require you authenticate HTTP requests with an API key or other token. **Please review the docs for your service to understand how they accept this data.**
Here’s an example showing an API key passed in an HTTP header:
```javascript theme={null}
import axios from "axios";
// Make an HTTP POST request using axios
const resp = await axios({
method: "POST",
url: `https://jsonplaceholder.typicode.com/posts`,
headers: {
"Content-Type": "application/json",
"X-API-Key": "123", // API KEY
},
data: {
name: "Luke",
},
});
```
[Copy this workflow to run this code on Pipedream](https://pipedream.com/@dylburger/send-an-http-request-with-headers-p_q6ClzO/edit).
## Send multiple HTTP requests in sequence
There are many ways to make multiple HTTP requests. This code shows you a simple example that sends the numbers `1`, `2`, and `3` in the body of an HTTP POST request:
```javascript theme={null}
import axios from "axios";
export default defineComponent({
async run({ steps, $ }) {
// We'll store each response and return them in this array
const responses = [];
for await (const num of [1, 2, 3]) {
const resp = await axios({
method: "POST",
url: "https://example.com",
data: {
num, // Will send the current value of num in the loop
},
});
responses.push(resp.data);
}
return responses;
},
});
```
This sends each HTTP request *in sequence*, one after another, and returns an array of response data returned from the URL to which you send the POST request. If you need to make requests *in parallel*, [see these docs](/workflows/building-workflows/code/nodejs/http-requests/#send-multiple-http-requests-in-parallel).
[Copy this workflow](https://pipedream.com/@dylburger/iterate-over-a-pipedream-step-export-sending-multiple-http-requests-p_ljCAPN/edit) and fill in your destination URL to see how this works. **This workflow iterates over the value of a Pipedream [step export](/workflows/#step-exports)** - data returned from a previous step. Since you often want to iterate over data returned from a Pipedream action or other code step, this is a common use case.
## Send multiple HTTP requests in parallel
Sometimes you’ll want to make multiple HTTP requests in parallel. If one request doesn’t depend on the results of another, this is a nice way to save processing time in a workflow. It can significantly cut down on the time you spend waiting for one request to finish, and for the next to begin.
To make requests in parallel, you can use two techniques. By default, we recommend using [`promise.allSettled`](https://developer.mozilla.org/en-US/Web/JavaScript/Reference/Global_Objects/Promise/allSettled), which makes all HTTP requests and returns data on their success / failure. If an HTTP request fails, all other requests will proceed.
```javascript theme={null}
import axios from "axios";
export default defineComponent({
async run({ steps, $ }) {
const arr = [
"https://www.example.com",
"https://www.cnn.com",
"https://www.espn.com",
];
const promises = arr.map((url) => axios.get(url));
return Promise.allSettled(promises);
},
});
```
First, we generate an array of `axios.get` requests (which are all [Promises](https://developer.mozilla.org/en-US/Web/JavaScript/Reference/Global_Objects/Promise)), and then call `Promise.allSettled` to run them in parallel.
When you want to stop future requests when *one* of the requests fails, you can use [`Promise.all`](https://developer.mozilla.org/en-US/Web/JavaScript/Reference/Global_Objects/Promise/all), instead:
```javascript theme={null}
import axios from "axios";
export default defineComponent({
async run({ steps, $ }) {
const arr = [
"https://www.example.com",
"https://www.cnn.com",
"https://www.espn.com",
];
const promises = arr.map((url) => axios.get(url));
return Promise.all(promises);
},
});
```
The Mozilla docs expand on the difference between these methods, and when you may want to use one or the other:
> The `Promise.allSettled()` method returns a promise that resolves after all of the given promises have either fulfilled or rejected, with an array of objects that each describes the outcome of each promise.\
> It is typically used when you have multiple asynchronous tasks that are not dependent on one another to complete successfully, or you’d always like to know the result of each promise.\
> In comparison, the Promise returned by `Promise.all()` may be more appropriate if the tasks are dependent on each other / if you’d like to immediately reject upon any of them rejecting.
## Send a `multipart/form-data` request
```javascript axios theme={null}
import axios from "axios";
import FormData from "form-data";
export default defineComponent({
async run({ steps, $ }) {
const formData = new FormData();
formData.append("name", "Luke Skywalker");
const headers = formData.getHeaders();
const config = {
method: "POST",
url: "https://example.com",
headers,
data: formData,
};
return await axios(config);
}
});
```
```javascript http-request prop theme={null}
export default defineComponent({
props: {
httpRequest: {
type: "http_request",
label: "Example Multipart Form Request",
default: {
method: "POST",
url: "https://example.com",
headers: {
contentType: "multipart/form-data",
fields: [{ name: "Luke Skywalker" }]
}
}
},
},
async run({ steps, $ }) {
// Make an HTTP GET request using the http-request
const res = await this.httpRequest.execute();
// Retrieve just the data from the response
const { data } = res;
},
})
```
[Copy this workflow](https://pipedream.com/@dylburger/send-a-multipart-form-data-request-p_WxCQRyr/edit) to run this example.
## Download a file to the `/tmp` directory
This example shows you how to download a file to a file in [the `/tmp` directory](/workflows/building-workflows/code/nodejs/working-with-files/). This can be especially helpful for downloading large files: it streams the file to disk, minimizing the memory the workflow uses when downloading the file.
```javascript theme={null}
import { pipeline } from "stream/promises";
import fs from "fs";
import got from "got";
export default defineComponent({
async run({ steps, $ }) {
// Download the webpage HTML file to /tmp
return await pipeline(
got.stream("https://example.com"),
fs.createWriteStream('/tmp/file.html')
);
}
})
```
[Copy this workflow](https://pipedream.com/new?h=tch_wqKfoW) to run this example.
## Upload a file from the `/tmp` directory
This example shows you how to make a `multipart/form-data` request with a file as a form part. You can store and read any files from [the `/tmp` directory](/workflows/building-workflows/code/nodejs/working-with-files/#the-tmp-directory).
This can be especially helpful for uploading large files: it streams the file from disk, minimizing the memory the workflow uses when uploading the file.
```javascript theme={null}
import axios from "axios";
import fs from "fs";
import FormData from "form-data";
export default defineComponent({
async run({ steps, $ }) {
const formData = new FormData();
formData.append("file", fs.createReadStream('/tmp/file.pdf'));
const headers = formData.getHeaders();
const config = {
method: "POST",
url: "https://example.com",
headers,
data: formData,
};
return await axios(config);
}
});
```
[Copy this workflow](https://pipedream.com/new?h=tch_Oknf4r) to run this example.
## IP addresses for HTTP requests made from Pipedream workflows
By default, [HTTP requests made from Pipedream can come from a large range of IP addresses](/privacy-and-security/#hosting-details). **If you need to restrict the IP addresses HTTP requests come from, you have two options**:
* [Use a Pipedream VPC](/workflows/vpc/) to route all outbound HTTP requests through a single IP address
* If you don’t need to access the HTTP response data, you can [use `$send.http()`](/workflows/data-management/destinations/http/) to send requests from a [limited set of IP addresses](/workflows/data-management/destinations/http/#ip-addresses-for-pipedream-http-requests).
## Use an HTTP proxy to proxy requests through another host
By default, HTTP requests made from Pipedream can come from a range of IP addresses. **If you need to make requests from a single IP address, you can route traffic through an HTTP proxy**:
```javascript theme={null}
import axios from "axios";
import httpsProxyAgent from "https-proxy-agent";
export default defineComponent({
props: {
user: {
type: 'string',
label: 'Username',
description: 'The username for the HTTP proxy authentication',
},
pass: {
type: 'string',
label: 'Password',
secret: true,
description: 'The password for the HTTP proxy authentication',
},
host: {
type: 'string',
label: "HTTP Proxy Host",
description: "The URL for the HTTP proxy",
},
port: {
type: "string",
label: "Port",
description: "The port the HTTP proxy is accepting requests at",
},
target_host: {
type: 'string',
label: "Target Host",
description: "The URL for the end target to reach through the proxy",
},
method: {
type: 'string',
default: 'GET',
label: "HTTP method",
description: "The HTTP method to use to reach the end target host"
},
body: {
type: 'object',
label: "HTTP body",
description: "The HTTP body payload to send to the end target host"
}
},
async run({ steps, $ }) {
const { user, pass, host, port, target_host, method } = this;
const agent = new httpsProxyAgent(`http://${user}:${pass}@${host}:${port}`);
const config = {
method,
url: target_host,
body,
httpsAgent: agent,
};
return await axios.request(config);
}
});
```
[Copy this workflow to run this code on Pipedream](https://pipedream.com/new?h=tch_mypfby).
## Stream a downloaded file directly to another URL
Sometimes you need to upload a downloaded file directly to another service, without processing the downloaded file. You could [download the file](/workflows/building-workflows/code/nodejs/http-requests/#download-a-file-to-the-tmp-directory) and then [upload it](/workflows/building-workflows/code/nodejs/http-requests/#upload-a-file-from-the-tmp-directory) to the other URL, but these intermediate steps are unnecessary: you can just stream the download to the other service directly, without saving the file to disk.
This method is especially effective for large files that exceed the [limits of the `/tmp` directory](/workflows/limits/#disk).
[Copy this workflow](https://pipedream.com/@dylburger/stream-download-to-upload-p_5VCLoa1/edit) or paste this code into a [new Node.js code step](/workflows/building-workflows/code/nodejs/):
```javascript theme={null}
import stream from "stream";
import { promisify } from "util";
import got from "got";
export default defineComponent({
async run({ steps, $ }) {
const pipeline = promisify(stream.pipeline);
await pipeline(
got.stream("https://example.com"),
got.stream.post("https://example2.com")
);
}
});
```
You’ll want to replace `https://example.com` with the URL you’d like to stream data from, and replace `https://example2.com` with the URL you’d like to send the data *to*. `got` streams the content directly, downloading the file using a `GET` request and uploading it as a `POST` request.
If you need to modify this behavior, [see the `got` Stream API](https://github.com/sindresorhus/got#gotstreamurl-options).
## Catch and process HTTP errors
By default, `axios` throws an error when the HTTP response code is in the 400-500 range (a client or server error). If you’d like to process the error data instead of throwing an error, you can pass a custom function to the `validateStatus` property:
```javascript theme={null}
import axios from "axios";
export default defineComponent({
async run({ steps, $ }) {
const resp = await axios({
url: "https://httpstat.us/400",
validateStatus: () => true, // will not throw error when axios gets a 400+ status code (the default behavior)
});
if (resp.status >= 400) {
this.debug = resp;
throw new Error(JSON.stringify(resp.data)); // This can be modified to throw any error you'd like
}
return resp;
}
});
```
See [the `axios` docs](https://github.com/axios/axios#request-config) for more details.
## Paginating API requests
When you fetch data from an API, the API may return records in “pages”. For example, if you’re trying to fetch a list of 1,000 records, the API might return those in groups of 100 items.
Different APIs paginate data in different ways. You’ll need to consult the docs of your API provider to see how they suggest you paginate through records.
## Send GraphQL request
Make a GraphQL request using the `graphql-request` npm package:
```javascript theme={null}
import { graphql } from 'graphql'
import { request, gql } from 'graphql-request'
export default defineComponent({
async run({ steps, $ }) {
const document = gql`
query samplePokeAPIquery {
generations: pokemon_v2_generation {
name
pokemon_species: pokemon_v2_pokemonspecies_aggregate {
aggregate {
count
}
}
}
}
`
return await request('https://beta.pokeapi.co/graphql/v1beta', document)
},
})
```
The graphql package is required
The `graphql` package is required for popular GraphQL clients to function, like `graphql-request` and `urql`.
Even though you will not need to use the `graphql` code itself in your code step, it’s required to import it in order for `graphql-request` to function.
### Send an authenticated GraphQL request
Authenticate your connected accounts in Pipedream with GraphQL requests using the `app` prop:
```javascript theme={null}
import { graphql } from 'graphql'
import { GraphQLClient, gql } from 'graphql-request'
export default defineComponent({
props: {
github: {
type: 'app',
app: 'github'
}
},
async run({ steps, $ }) {
const me = gql`
query {
viewer {
login
}
}
`
const client = new GraphQLClient('https://api.github.com/graphql', {
headers: {
authorization: `Bearer ${this.github.$auth.oauth_access_token}`,
},
})
return await client.request(me)
},
})
```
Alternatively, you can use Environment Variables as well for simple API key based GraphQL APIs.
## Send a `POST` request to submit data
POST sample JSON to [JSONPlaceholder](https://jsonplaceholder.typicode.com/), a free mock API service:
```javascript axios theme={null}
import axios from "axios";
export default defineComponent({
async run({ steps, $ }) {
// Make an HTTP POST request using axios
const resp = await axios({
method: "POST",
url: `https://jsonplaceholder.typicode.com/posts`,
data: {
name: "Luke",
},
});
// Retrieve just the data from the response
const { data } = resp;
}
});
```
```javascript http-request prop theme={null}
export default defineComponent({
props: {
httpRequest: {
type: "http_request",
label: "JSON Placeholder API request",
default: {
method: "POST",
url: "https://jsonplaceholder.typicode.com/posts",
body: {
contentType: "application/json",
fields: [{ name: "Luke" }]
}
}
},
},
async run({ steps, $ }) {
// Make an HTTP GET request using the http-request
const res = await this.httpRequest.execute();
// Retrieve just the data from the response
const { data } = res;
},
})
```
When you make a `POST` request, you pass `POST` as the `method`, and include the data you’d like to send in the `data` object.
## Pass query string parameters to a `GET` request
Retrieve fake comment data on a specific post using [JSONPlaceholder](https://jsonplaceholder.typicode.com/), a free mock API service. Here, you fetch data from the `/comments` resource, retrieving data for a specific post by query string parameter: `/comments?postId=1`.
```javascript theme={null}
import axios from "axios";
export default defineComponent({
async run({ steps, $ }) {
// Make an HTTP GET request using axios
const resp = await axios({
method: "GET",
url: `https://jsonplaceholder.typicode.com/comments`,
params: {
postId: 1,
},
});
// Retrieve just the data from the response
const { data } = resp;
}
});
```
```javascript theme={null}
export default defineComponent({
props: {
httpRequest: {
type: "http_request",
label: "JSON Placeholder API request",
default: {
method: "GET",
url: "https://jsonplaceholder.typicode.com/comments",
params: {
fields: [{ postId: 1 }]
}
}
},
},
async run({ steps, $ }) {
// Make an HTTP GET request using the http-request
const res = await this.httpRequest.execute();
// Retrieve just the data from the response
const { data } = res;
},
})
```
You should pass query string parameters using the `params` object, like above. When you do, `axios` automatically [URL-encodes](https://www.w3schools.com/tags/ref_urlencode.ASP) the parameters for you, which you’d otherwise have to do manually.
## Send a request with HTTP headers
You pass HTTP headers in the `headers` object of the `axios` request:
```javascript theme={null}
import axios from "axios";
// Make an HTTP POST request using axios
const resp = await axios({
method: "POST",
url: `https://jsonplaceholder.typicode.com/posts`,
headers: {
"Content-Type": "application/json",
},
data: {
name: "Luke",
},
});
```
## Send a request with a secret or API key
Most APIs require you authenticate HTTP requests with an API key or other token. **Please review the docs for your service to understand how they accept this data.**
Here’s an example showing an API key passed in an HTTP header:
```javascript theme={null}
import axios from "axios";
// Make an HTTP POST request using axios
const resp = await axios({
method: "POST",
url: `https://jsonplaceholder.typicode.com/posts`,
headers: {
"Content-Type": "application/json",
"X-API-Key": "123", // API KEY
},
data: {
name: "Luke",
},
});
```
[Copy this workflow to run this code on Pipedream](https://pipedream.com/@dylburger/send-an-http-request-with-headers-p_q6ClzO/edit).
## Send multiple HTTP requests in sequence
There are many ways to make multiple HTTP requests. This code shows you a simple example that sends the numbers `1`, `2`, and `3` in the body of an HTTP POST request:
```javascript theme={null}
import axios from "axios";
export default defineComponent({
async run({ steps, $ }) {
// We'll store each response and return them in this array
const responses = [];
for await (const num of [1, 2, 3]) {
const resp = await axios({
method: "POST",
url: "https://example.com",
data: {
num, // Will send the current value of num in the loop
},
});
responses.push(resp.data);
}
return responses;
},
});
```
This sends each HTTP request *in sequence*, one after another, and returns an array of response data returned from the URL to which you send the POST request. If you need to make requests *in parallel*, [see these docs](/workflows/building-workflows/code/nodejs/http-requests/#send-multiple-http-requests-in-parallel).
[Copy this workflow](https://pipedream.com/@dylburger/iterate-over-a-pipedream-step-export-sending-multiple-http-requests-p_ljCAPN/edit) and fill in your destination URL to see how this works. **This workflow iterates over the value of a Pipedream [step export](/workflows/#step-exports)** - data returned from a previous step. Since you often want to iterate over data returned from a Pipedream action or other code step, this is a common use case.
## Send multiple HTTP requests in parallel
Sometimes you’ll want to make multiple HTTP requests in parallel. If one request doesn’t depend on the results of another, this is a nice way to save processing time in a workflow. It can significantly cut down on the time you spend waiting for one request to finish, and for the next to begin.
To make requests in parallel, you can use two techniques. By default, we recommend using [`promise.allSettled`](https://developer.mozilla.org/en-US/Web/JavaScript/Reference/Global_Objects/Promise/allSettled), which makes all HTTP requests and returns data on their success / failure. If an HTTP request fails, all other requests will proceed.
```javascript theme={null}
import axios from "axios";
export default defineComponent({
async run({ steps, $ }) {
const arr = [
"https://www.example.com",
"https://www.cnn.com",
"https://www.espn.com",
];
const promises = arr.map((url) => axios.get(url));
return Promise.allSettled(promises);
},
});
```
First, we generate an array of `axios.get` requests (which are all [Promises](https://developer.mozilla.org/en-US/Web/JavaScript/Reference/Global_Objects/Promise)), and then call `Promise.allSettled` to run them in parallel.
When you want to stop future requests when *one* of the requests fails, you can use [`Promise.all`](https://developer.mozilla.org/en-US/Web/JavaScript/Reference/Global_Objects/Promise/all), instead:
```javascript theme={null}
import axios from "axios";
export default defineComponent({
async run({ steps, $ }) {
const arr = [
"https://www.example.com",
"https://www.cnn.com",
"https://www.espn.com",
];
const promises = arr.map((url) => axios.get(url));
return Promise.all(promises);
},
});
```
The Mozilla docs expand on the difference between these methods, and when you may want to use one or the other:
> The `Promise.allSettled()` method returns a promise that resolves after all of the given promises have either fulfilled or rejected, with an array of objects that each describes the outcome of each promise.\
> It is typically used when you have multiple asynchronous tasks that are not dependent on one another to complete successfully, or you’d always like to know the result of each promise.\
> In comparison, the Promise returned by `Promise.all()` may be more appropriate if the tasks are dependent on each other / if you’d like to immediately reject upon any of them rejecting.
## Send a `multipart/form-data` request
```javascript axios theme={null}
import axios from "axios";
import FormData from "form-data";
export default defineComponent({
async run({ steps, $ }) {
const formData = new FormData();
formData.append("name", "Luke Skywalker");
const headers = formData.getHeaders();
const config = {
method: "POST",
url: "https://example.com",
headers,
data: formData,
};
return await axios(config);
}
});
```
```javascript http-request prop theme={null}
export default defineComponent({
props: {
httpRequest: {
type: "http_request",
label: "Example Multipart Form Request",
default: {
method: "POST",
url: "https://example.com",
headers: {
contentType: "multipart/form-data",
fields: [{ name: "Luke Skywalker" }]
}
}
},
},
async run({ steps, $ }) {
// Make an HTTP GET request using the http-request
const res = await this.httpRequest.execute();
// Retrieve just the data from the response
const { data } = res;
},
})
```
[Copy this workflow](https://pipedream.com/@dylburger/send-a-multipart-form-data-request-p_WxCQRyr/edit) to run this example.
## Download a file to the `/tmp` directory
This example shows you how to download a file to a file in [the `/tmp` directory](/workflows/building-workflows/code/nodejs/working-with-files/). This can be especially helpful for downloading large files: it streams the file to disk, minimizing the memory the workflow uses when downloading the file.
```javascript theme={null}
import { pipeline } from "stream/promises";
import fs from "fs";
import got from "got";
export default defineComponent({
async run({ steps, $ }) {
// Download the webpage HTML file to /tmp
return await pipeline(
got.stream("https://example.com"),
fs.createWriteStream('/tmp/file.html')
);
}
})
```
[Copy this workflow](https://pipedream.com/new?h=tch_wqKfoW) to run this example.
## Upload a file from the `/tmp` directory
This example shows you how to make a `multipart/form-data` request with a file as a form part. You can store and read any files from [the `/tmp` directory](/workflows/building-workflows/code/nodejs/working-with-files/#the-tmp-directory).
This can be especially helpful for uploading large files: it streams the file from disk, minimizing the memory the workflow uses when uploading the file.
```javascript theme={null}
import axios from "axios";
import fs from "fs";
import FormData from "form-data";
export default defineComponent({
async run({ steps, $ }) {
const formData = new FormData();
formData.append("file", fs.createReadStream('/tmp/file.pdf'));
const headers = formData.getHeaders();
const config = {
method: "POST",
url: "https://example.com",
headers,
data: formData,
};
return await axios(config);
}
});
```
[Copy this workflow](https://pipedream.com/new?h=tch_Oknf4r) to run this example.
## IP addresses for HTTP requests made from Pipedream workflows
By default, [HTTP requests made from Pipedream can come from a large range of IP addresses](/privacy-and-security/#hosting-details). **If you need to restrict the IP addresses HTTP requests come from, you have two options**:
* [Use a Pipedream VPC](/workflows/vpc/) to route all outbound HTTP requests through a single IP address
* If you don’t need to access the HTTP response data, you can [use `$send.http()`](/workflows/data-management/destinations/http/) to send requests from a [limited set of IP addresses](/workflows/data-management/destinations/http/#ip-addresses-for-pipedream-http-requests).
## Use an HTTP proxy to proxy requests through another host
By default, HTTP requests made from Pipedream can come from a range of IP addresses. **If you need to make requests from a single IP address, you can route traffic through an HTTP proxy**:
```javascript theme={null}
import axios from "axios";
import httpsProxyAgent from "https-proxy-agent";
export default defineComponent({
props: {
user: {
type: 'string',
label: 'Username',
description: 'The username for the HTTP proxy authentication',
},
pass: {
type: 'string',
label: 'Password',
secret: true,
description: 'The password for the HTTP proxy authentication',
},
host: {
type: 'string',
label: "HTTP Proxy Host",
description: "The URL for the HTTP proxy",
},
port: {
type: "string",
label: "Port",
description: "The port the HTTP proxy is accepting requests at",
},
target_host: {
type: 'string',
label: "Target Host",
description: "The URL for the end target to reach through the proxy",
},
method: {
type: 'string',
default: 'GET',
label: "HTTP method",
description: "The HTTP method to use to reach the end target host"
},
body: {
type: 'object',
label: "HTTP body",
description: "The HTTP body payload to send to the end target host"
}
},
async run({ steps, $ }) {
const { user, pass, host, port, target_host, method } = this;
const agent = new httpsProxyAgent(`http://${user}:${pass}@${host}:${port}`);
const config = {
method,
url: target_host,
body,
httpsAgent: agent,
};
return await axios.request(config);
}
});
```
[Copy this workflow to run this code on Pipedream](https://pipedream.com/new?h=tch_mypfby).
## Stream a downloaded file directly to another URL
Sometimes you need to upload a downloaded file directly to another service, without processing the downloaded file. You could [download the file](/workflows/building-workflows/code/nodejs/http-requests/#download-a-file-to-the-tmp-directory) and then [upload it](/workflows/building-workflows/code/nodejs/http-requests/#upload-a-file-from-the-tmp-directory) to the other URL, but these intermediate steps are unnecessary: you can just stream the download to the other service directly, without saving the file to disk.
This method is especially effective for large files that exceed the [limits of the `/tmp` directory](/workflows/limits/#disk).
[Copy this workflow](https://pipedream.com/@dylburger/stream-download-to-upload-p_5VCLoa1/edit) or paste this code into a [new Node.js code step](/workflows/building-workflows/code/nodejs/):
```javascript theme={null}
import stream from "stream";
import { promisify } from "util";
import got from "got";
export default defineComponent({
async run({ steps, $ }) {
const pipeline = promisify(stream.pipeline);
await pipeline(
got.stream("https://example.com"),
got.stream.post("https://example2.com")
);
}
});
```
You’ll want to replace `https://example.com` with the URL you’d like to stream data from, and replace `https://example2.com` with the URL you’d like to send the data *to*. `got` streams the content directly, downloading the file using a `GET` request and uploading it as a `POST` request.
If you need to modify this behavior, [see the `got` Stream API](https://github.com/sindresorhus/got#gotstreamurl-options).
## Catch and process HTTP errors
By default, `axios` throws an error when the HTTP response code is in the 400-500 range (a client or server error). If you’d like to process the error data instead of throwing an error, you can pass a custom function to the `validateStatus` property:
```javascript theme={null}
import axios from "axios";
export default defineComponent({
async run({ steps, $ }) {
const resp = await axios({
url: "https://httpstat.us/400",
validateStatus: () => true, // will not throw error when axios gets a 400+ status code (the default behavior)
});
if (resp.status >= 400) {
this.debug = resp;
throw new Error(JSON.stringify(resp.data)); // This can be modified to throw any error you'd like
}
return resp;
}
});
```
See [the `axios` docs](https://github.com/axios/axios#request-config) for more details.
## Paginating API requests
When you fetch data from an API, the API may return records in “pages”. For example, if you’re trying to fetch a list of 1,000 records, the API might return those in groups of 100 items.
Different APIs paginate data in different ways. You’ll need to consult the docs of your API provider to see how they suggest you paginate through records.
## Send GraphQL request
Make a GraphQL request using the `graphql-request` npm package:
```javascript theme={null}
import { graphql } from 'graphql'
import { request, gql } from 'graphql-request'
export default defineComponent({
async run({ steps, $ }) {
const document = gql`
query samplePokeAPIquery {
generations: pokemon_v2_generation {
name
pokemon_species: pokemon_v2_pokemonspecies_aggregate {
aggregate {
count
}
}
}
}
`
return await request('https://beta.pokeapi.co/graphql/v1beta', document)
},
})
```
The graphql package is required
The `graphql` package is required for popular GraphQL clients to function, like `graphql-request` and `urql`.
Even though you will not need to use the `graphql` code itself in your code step, it’s required to import it in order for `graphql-request` to function.
### Send an authenticated GraphQL request
Authenticate your connected accounts in Pipedream with GraphQL requests using the `app` prop:
```javascript theme={null}
import { graphql } from 'graphql'
import { GraphQLClient, gql } from 'graphql-request'
export default defineComponent({
props: {
github: {
type: 'app',
app: 'github'
}
},
async run({ steps, $ }) {
const me = gql`
query {
viewer {
login
}
}
`
const client = new GraphQLClient('https://api.github.com/graphql', {
headers: {
authorization: `Bearer ${this.github.$auth.oauth_access_token}`,
},
})
return await client.request(me)
},
})
```
Alternatively, you can use Environment Variables as well for simple API key based GraphQL APIs.